(For this tutorial you will need Adobe Illustrator (CS2 or above), Adobe Photoshop, and some paper and a nice black pen.)
Firstly, when you are drawing your design, cartoon, illustration, keep in mind how you will be importing it into Illustrator. I will be showing you how to create image made of one solid vector colour, so don't create an image with rendering or form, unless it is a solid black colour. Create something like this:

So, once you have drawn up your image, scan it into your computer, grayscale, at at least 300 DPI (dots per inch). This is a nice resolution to scan in as a general rule, it is the normal resolution for at which Print Companies print at. Then open up Photoshop (I use CS2, but the version isn't important for this tutorial) and open your drawing.
Use the crop tool to crop your drawing down so you just see the drawing and the surrounding white paper as shown below:

Then go and adjust the levels to give the image more contrast. The levels is located in the photoshop menu Image>Adjustments>Levels or you can just CRL+L in windows or Apple+L on a Mac. Adjust the levels like so:

Save this file as a PSD, JPG or TIFF if you like and you can close photoshop.
Great, now we are ready to import your file into Illustrator!
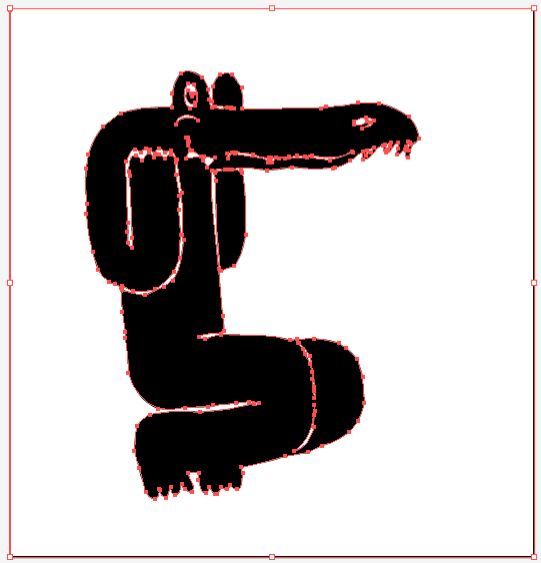
Open Illustrator and File>Open your edited scan. It should open up looking much the same as it did in photoshop:

Next go up to the menu Object>Livetrace>Tracing options. A box like this will open with default settings:


You have here the white of the paper, and the different objects that make up your drawing (in this case the eye, the arm, the leg). Now, because if you try to move the vector around you will find they are grouped, you need to ungroup the selection. Object>Ungroup or right-click the image>ungroup.
Great. Now click outside the panel area to unselect the vector paths, and then click again on the WHITE BACKGROUND. It should look like this:

Once you have this white area selected we want to grab all the other white areas in the vector, so go up to Select>Same>Fill Colour. This will select all the other white vectors Live Trace has created. Hit the Delete button. Now we don't have any white areas left in the file.
Now press CTR+A or (Apple+A on a Mac) to select all the objects and then CTR+G or Apple+G, to group you vector.
Nice! You now have a Vector image you can put on top of any background and you can change it into any colour you wish (using the the colour slider or swatches).


I used this technique to create the following Design. Enjoy! Please do leave a comment if you have any questions or anything to mention I may have missed out.

No comments:
Post a Comment